Flows
Overview
Flows define the business logic and user workflow of your Opadeez application. They orchestrate sequences of actions, control data processing, and guide users through specific business processes. Flows are the backbone of your application's functionality, connecting data operations, user interactions, and business rules into cohesive workflows.
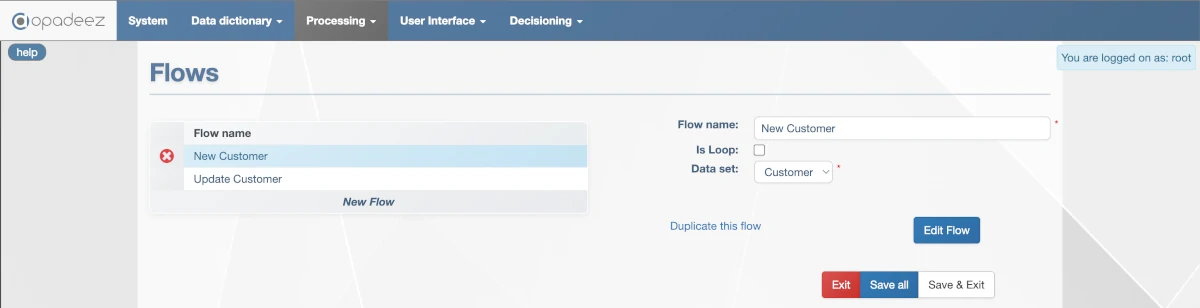
Flow configuration interface showing flow properties and settings
Flow Configuration
Flow Name
- Purpose: Unique identifier for the flow
- Requirement: Must be unique across all flows in the system
- Usage: Referenced in menus, pages, and other flows
- Best Practice: Use descriptive names that indicate the flow's purpose (e.g., "CustomerRegistration", "ProjectApproval")
Is Loop
- Default Behavior: User redirected to main menu/home page after flow completion
- Loop Behavior: Flow execution restarts from the beginning instead of ending
- Use Cases: Data entry workflows, repetitive processes, batch operations
- Example: Invoice entry flow that allows continuous invoice creation
Data Set
- Purpose: Links the flow to a specific DataSet for data operations
- Requirement: Each flow must be linked to exactly one DataSet
- Data Access: All data operations within the flow use the selected DataSet structure
- Context: Defines the data context and navigation hierarchy for the flow
Flow Management
Duplicate This Flow
- Purpose: Create a copy of the current flow
- Benefit: Reuse existing flow logic as a starting point
- Modification: Copy can be modified independently
- Use Case: Create variations of similar workflows
Edit Flow
- Purpose: Open the Flow Editor interface
- Function: Access the visual flow design environment
- Capability: Define action sequences and business logic
Flow Editor
The Flow Editor is a visual interface for designing and managing flow logic through drag-and-drop actions and visual workflow representation.
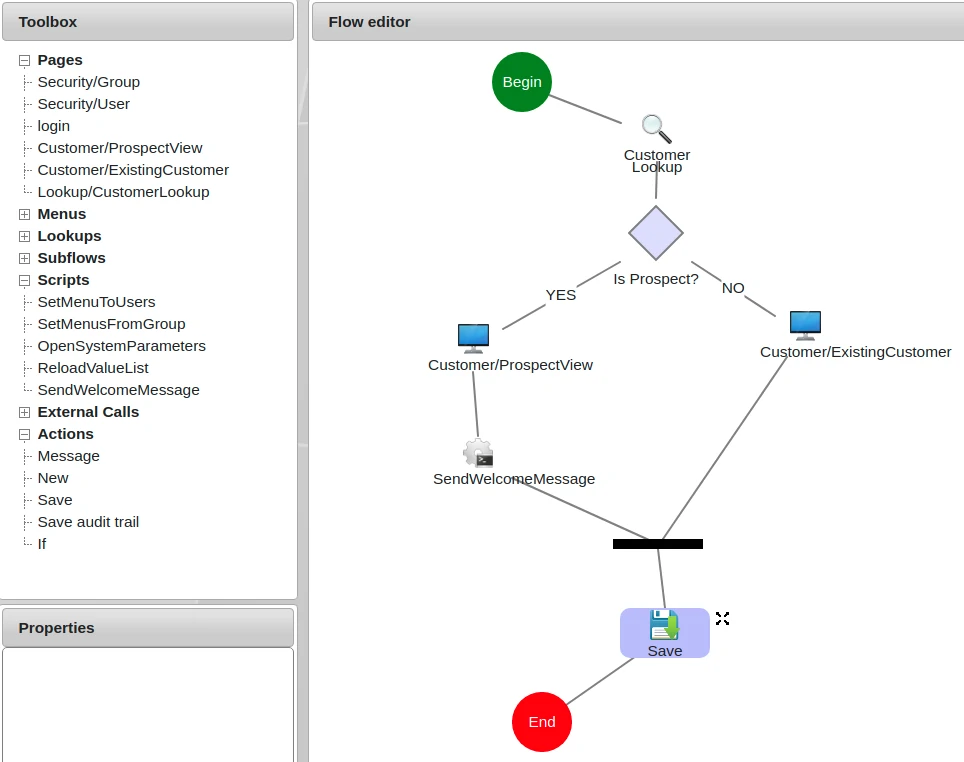
Flow Editor showing the main design area, toolbox, and properties panel
Interface Components
Flow Editor (Main Frame)
- Purpose: Visual design area for defining action sequences
- Functionality: Drag-and-drop arrangement of action objects
- Structure: Actions flow from Begin to End in execution order
- Visual Representation: Clear workflow visualization with connecting lines
Toolbox
- Purpose: Provides available actions for the flow
- Pre-defined Actions: Save, If conditions, loops, and other standard operations
- Solution Objects: Existing pages, lookups, scripts, and other components
- Usage: Click to create floating actions that can be inserted into the flow
Properties Panel
- Purpose: Configure properties of the selected action
- Context-Sensitive: Shows relevant settings for the current action
- Configuration: Set parameters, conditions, and behavior options
Working with Actions
Adding Actions to the Flow
- Select Action: Click on an action in the Toolbox
- Floating Action: Action appears as a floating object in the Flow Editor
- Insert Action: Drag-drop the floating action onto an existing action or Begin element
- Positioning: Action is inserted after the target action in the execution sequence
Moving Actions Within the Flow
- Detach Action: Click the detach icon (top-right corner of action)
- Floating State: Action becomes floating and can be repositioned
- Reposition: Drag-drop onto another action to change execution order
- Sequence Update: Flow execution order updates automatically
Deleting Actions
- Detach Action: Click the detach icon to make the action floating
- Automatic Deletion: Floating actions disappear when creating new actions or making others floating
- Save Behavior: Floating actions are not saved and will be deleted automatically
Creating Conditions
If Action Structure
Conditional logic is implemented using "If" actions that create branching workflows:
- Diamond Shape: Beginning of the If condition
- Yes Branch: Actions executed when condition is true
- No Branch: Actions executed when condition is false
- Black Rectangle: End of the If condition where branches rejoin
Building Conditional Logic
- Add If Action: Insert an "If" action from the toolbox
- First Action: Drag-drop the first action onto the diamond shape (goes to Yes branch)
- Second Action: Drag-drop the next action onto the diamond shape (goes to No branch)
- Branch Management: Actions alternate between Yes and No branches when added to the diamond
Moving Actions Between Branches
- Detach Action: Click the detach icon on the action to move
- Reposition: Drag-drop back onto the diamond shape
- Branch Switching: Action moves to the opposite branch (Yes ↔ No)
Flow Types and Patterns
Data Entry Flows
- Purpose: Capture and validate user input
- Pattern: Page → Validation → Save → Confirmation
- Loop Option: Enable for continuous data entry
Approval Flows
- Purpose: Route items through approval processes
- Pattern: Review → If (Approved) → Update Status → Notify
- Branching: Different paths for approval/rejection
Calculation Flows
- Purpose: Perform complex business calculations
- Pattern: Load Data → Calculate → Validate → Save Results
- Scripts: Often include custom calculation scripts
Integration Flows
- Purpose: Exchange data with external systems
- Pattern: Prepare Data → External Call → Process Response → Update
- Error Handling: Include conditions for handling failures
Best Practices
Flow Design
- Clear Purpose: Each flow should have a single, well-defined purpose
- Logical Sequence: Arrange actions in intuitive execution order
- Error Handling: Include validation and error handling logic
- User Experience: Design flows that guide users naturally through processes
Action Organization
- Meaningful Names: Use descriptive names for custom actions
- Modular Design: Break complex flows into smaller, reusable components
- Conditional Logic: Use If actions for business rule implementation
- Performance: Minimize unnecessary database operations
Testing and Maintenance
- Test Scenarios: Test all branches and conditions thoroughly
- Documentation: Document complex business logic and conditions
- Version Control: Use flow duplication for testing changes
- Monitoring: Monitor flow performance and user feedback
Common Flow Examples
Customer Registration Flow
- Begin
- Customer Entry Page - Capture customer information
- Validation - Check required fields and data quality
- If (Valid)
- Yes: Save Customer → Confirmation Page
- No: Error Message → Return to Entry Page
- End
Project Approval Flow
- Begin
- Project Review Page - Display project details
- If (Approved)
- Yes: Update Status to "Approved" → Send Approval Notification
- No: Update Status to "Rejected" → Send Rejection Notification
- Save Changes
- End
Getting Started
Ready to create flows? Follow these resources:
- Your First Application - Part 4: Step-by-step tutorial for creating flows
- Data Set Definition: Create DataSets before building flows
Related Topics
- Data Set Definition: Understanding DataSets for flow data context
- Basic Concepts: Fundamental Opadeez terminology
- Platform Overview: See how flows fit into the complete platform