Your First Application - Part 4
Creating Flows and User Interface
In Part 3, we created a complete data model. Now we'll create flows and user interfaces to allow users to create, edit, and search for customers and their projects.
Step 1: Create the Customer Page
Before creating flows, we need a page to capture Customer and Project data:
- Navigate to User Interface → Pages
- Click "New Page"
- Configure the page:
- Page Name:
Customer - Data set:
Customer - Page mode:
Assisted
- Page Name:
- Click "Edit Page"
Step 2: Design the Page Layout
Use the page designer to create a comprehensive customer information page:
Page Structure
- Under Layout: Use Sections and Layouts to create the page structure
- Under Components: Use the Text component to add a page title (e.g., "Customer Information")
- Under Fields: Open the Customer folder and drag-drop the desired fields to the page
Add Project Selector
- Under Selectors: Drag-drop the Project component to the page
- With the Selector selected, configure in the Properties section:
- Alias:
Project(non-editable) - Titles & Display: Add
NameandStatusin the selector display - Type:
Array - Order Field: Leave blank (order not important for projects)
- Translate Values: Enable to show full text (Pre-sales, In-progress, Complete) or disable for codes (P, I, C)
- Show Add: Enable so users can create new projects
- Show Delete: Enable so users can delete projects
- Add Label:
Create a new project - Delete Label: Leave empty for X icon
- Alias:
Add Project Fields
Add fields related to projects. These fields will show values from the currently selected project:
- Create a 2-column layout:
- Left column (6/12): Show the selector
- Right column (6/12): Show project fields
Add Action Buttons
Add a new section with two buttons:
Cancel Button
- Text:
Cancel - Predefined Action:
Exit - Confirmation:
Are you sure? - Style:
Button Danger
Save Button
- Text:
Save & Continue - Predefined Action:
Next(moves flow to next action) - Style:
Button Success
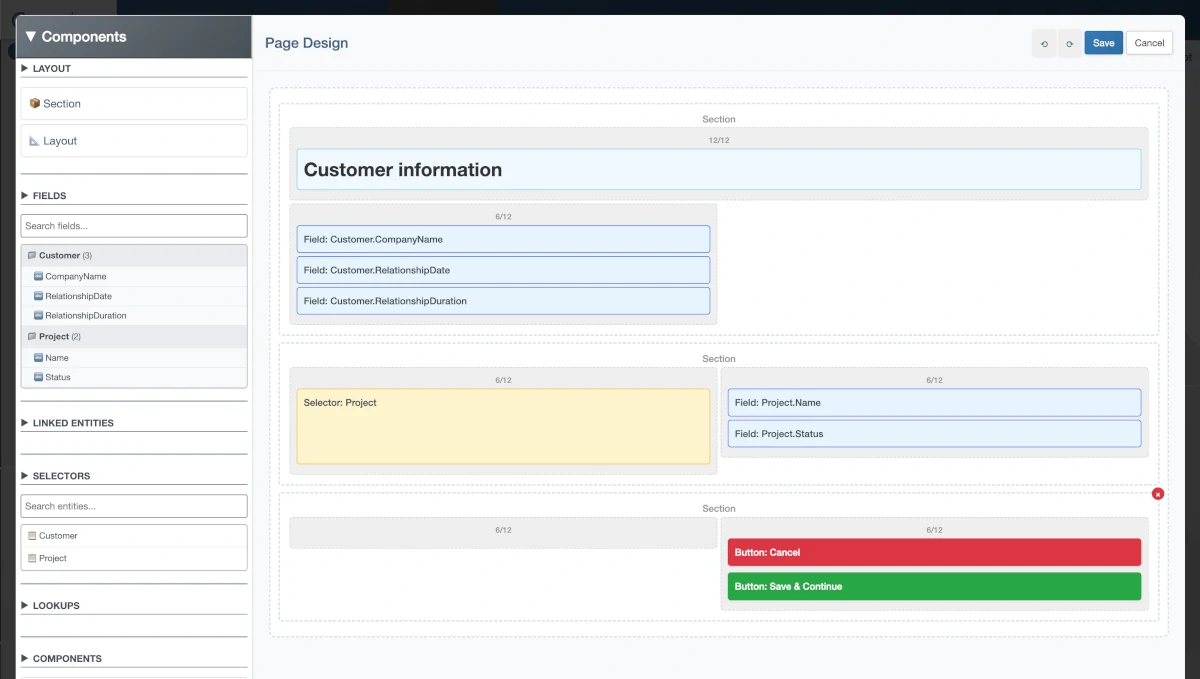
Customer page layout with fields, project selector, and action buttons
Step 3: Create the New Customer Flow
- Navigate to Processing → Flows
- Click "New Flow"
- Configure:
- Flow name:
New Customer - Data set:
Customer
- Flow name:
- Click "Edit Flow"
Build the Flow
- Click "Actions - New" to create a "New" action
- Drag the action on top of "Begin" to add it to the flow
- Add the Customer page followed by Save action to the flow
This simple flow will:
- Create a new customer record
- Show the page for user to enter customer and project information
- Save the complete record (Customer and Project data)
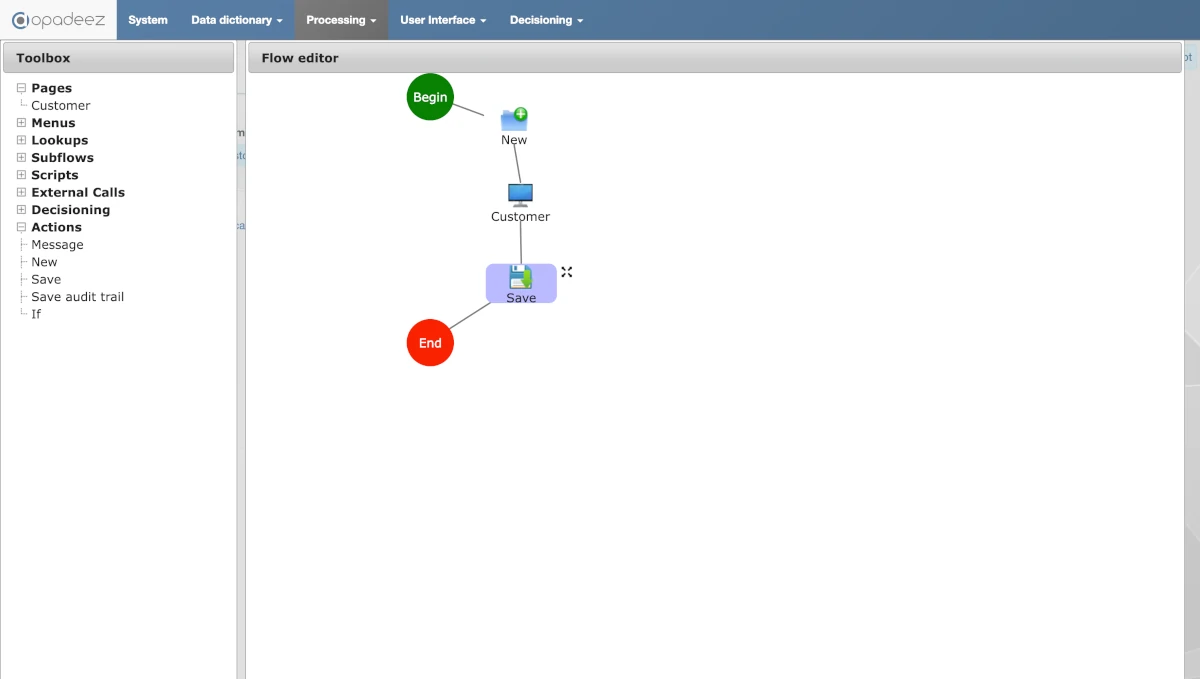
Flow showing New → Customer Page → Save sequence
Step 4: Create Menu Item for New Customer
- Navigate to User Interface → Menu
- Click "New Menu item"
- Configure:
- Menu name:
New Customer - Flow:
New Customer - Id:
3(refers to "Customer write" in MENU_OPTIONS from Part 2) - Depth:
1
- Menu name:
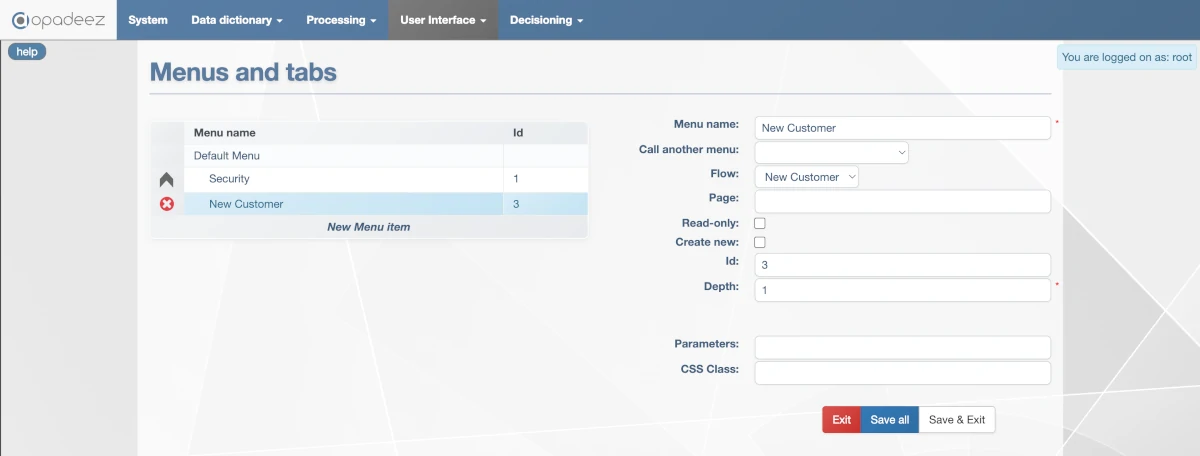
Menu item configuration linking to the New Customer flow
- Save your changes and deploy the solution
Step 5: Test the New Customer Functionality
After deployment, login to the runtime solution and test the new functionality:
Testing the Customer Creation Process
- Click "New Customer" from the menu
- Enter a Company name
- For Relationship date, use the date picker to select a date
- Notice how the "Relationship duration" field appears only when a date is entered (dynamic visibility rule)
- Use the "Create a new project" option in the selector
- When you create or select different projects, watch how the Name and Status fields update
- Click "Save & Continue" to save the record
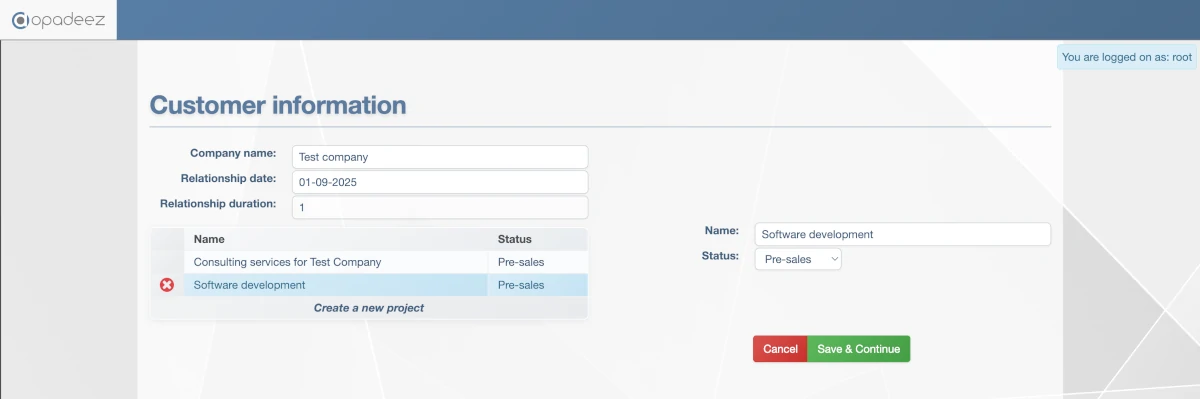
Runtime customer page showing dynamic fields, date picker, and project selector in action
Step 6: Create Customer Lookup
Now we'll create functionality to search and edit existing customers:
- Navigate to Processing → Lookups
- Click "New Lookup"
- Configure:
- Lookup name:
Customer lookup - Results Limit:
50 - Data set:
Customer
- Lookup name:
Configure Search Filter
Set the filter using SQL syntax with parameter values:
(Customer.CompanyName LIKE CONCAT('%', %Customer%, '%'))
AND (Project.Name LIKE CONCAT('%', %Project%, '%'))
Add Search Parameters
- Click "Add a parameter" for Customer:
- Parameter name:
Customer - Type from:
Customer - Attribute:
CompanyName
- Parameter name:
- Click "Add a parameter" for Project:
- Parameter name:
Project - Type from:
Project - Attribute:
Name
- Parameter name:
Configure Display Fields
- Click "Add a display field":
- Title:
Customer - Entity alias:
Customer - Attribute:
CompanyName
- Title:
- Click "Add a display field":
- Title:
Project - Entity alias:
Project - Attribute:
Name
- Title:
- Click "Add a display field":
- Title: Leave empty
- Entity alias:
Project - Attribute:
Status
Configure Sort Order
- Click "Add an order field":
- Entity alias:
Customer - Attribute:
CompanyName - Ascending:
Ascending
- Entity alias:
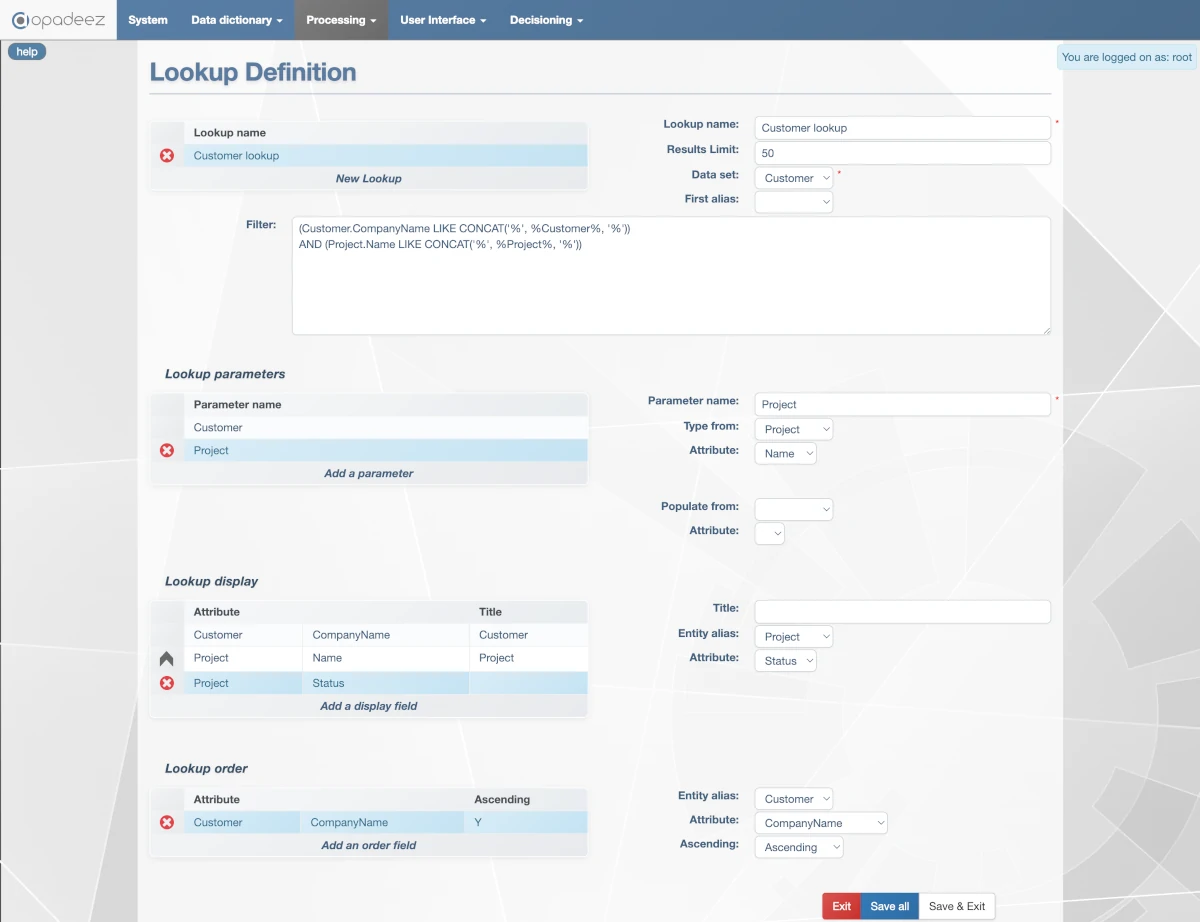
Customer lookup configuration with search parameters, display fields, and sorting
Step 7: Create Customer Lookup Page
- Navigate to User Interface → Pages
- Click "New Page"
- Configure:
- Page Name:
Customer Lookup - Data set:
Customer - Page mode:
Assisted
- Page Name:
Design the Lookup Page
Under "Lookups" you'll find the Customer lookup. Open it to access:
Lookup Parameters
- Drag the lookup parameters to the page
Search Button
- Text:
Search - Auto Search:
Always(shows results when page opens) - Style:
Button Success
Results Display
- Label:
Click on a row to open a customer - Action:
Open(opens selected customer record) - Translate Values:
True
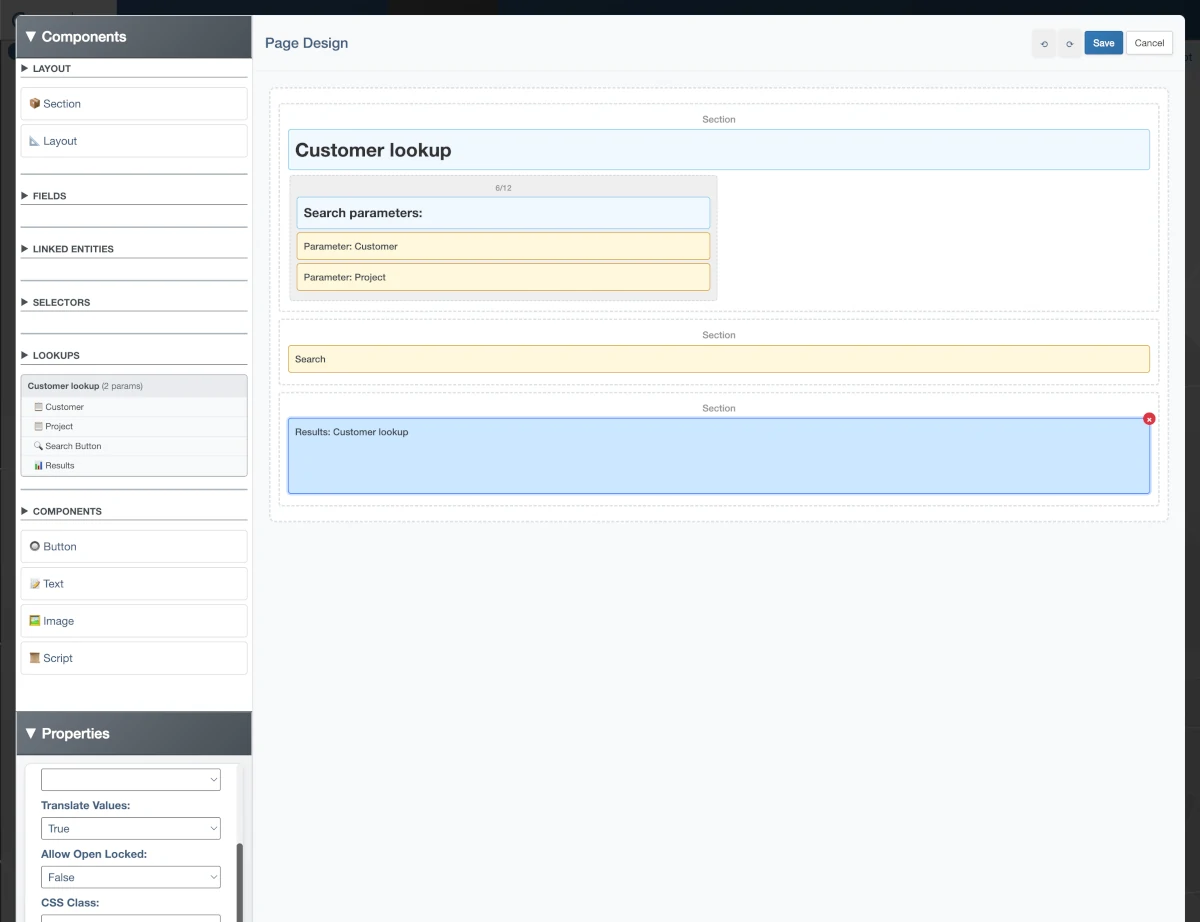
Lookup page with search parameters, search button, and results display
Step 8: Create Update Customer Flow
- Navigate to Processing → Flows
- Click "New Flow"
- Configure:
- Flow name:
Update Customer - Data set:
Customer
- Flow name:
- Click "Edit Flow"
Build the Update Flow
Create a flow with the following sequence:
- Add the Customer Lookup page
- Add the Customer page (for editing)
- Add Save action
jsp=Lookup/Customer
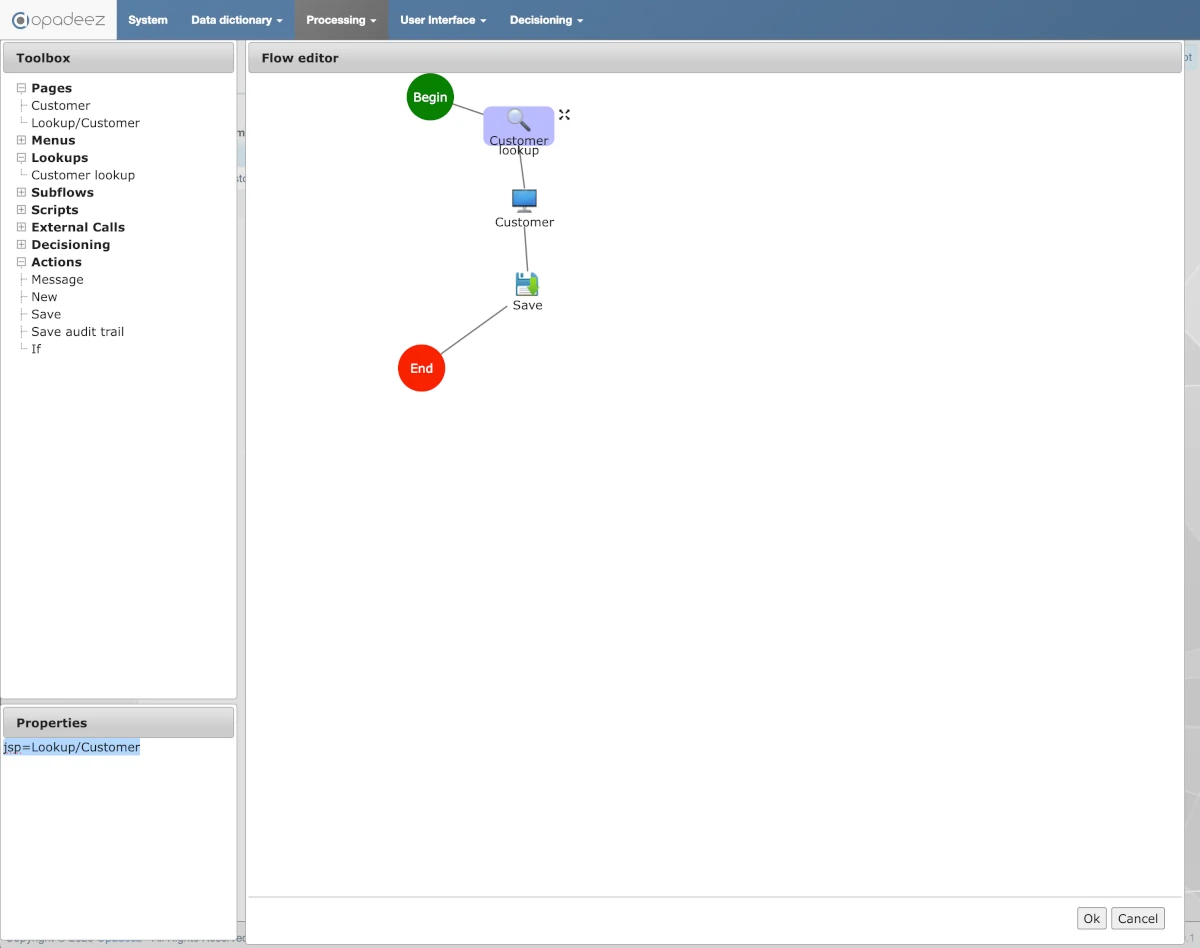
Update flow showing Lookup → Customer Page → Save sequence with jsp property
Step 9: Create Update Customer Menu
- Navigate to User Interface → Menu
- Click "New Menu item"
- Configure:
- Menu name:
Update Customer - Flow:
Update Customer - Id:
3(refers to "Customer read" in MENU_OPTIONS) - Depth:
1
- Menu name:
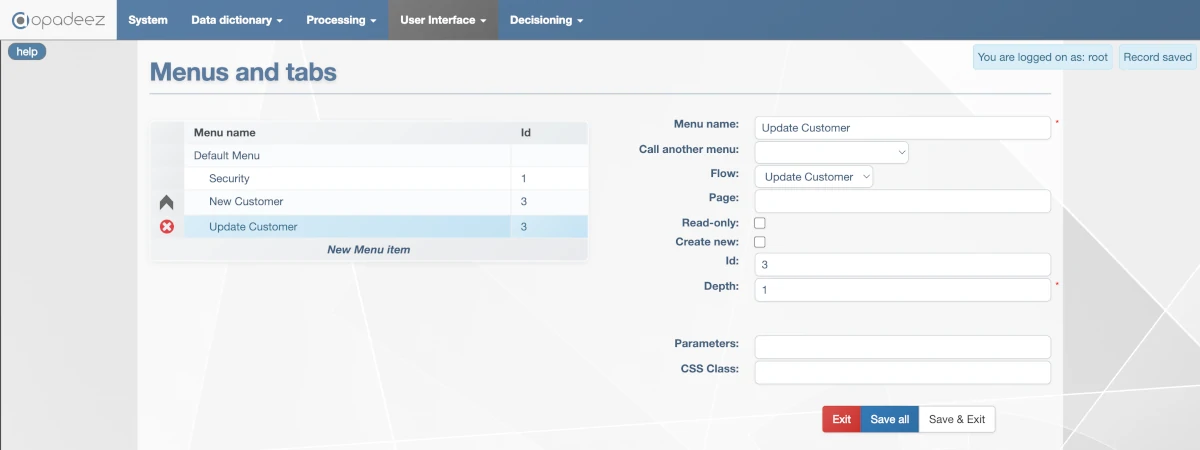
Menu item configuration for the Update Customer flow
- Save your changes and deploy the solution
- Create: New Customer flow with data entry page
- Read: Customer lookup with search capabilities
- Update: Edit existing customer records
- Delete: Project deletion through the selector
Final Testing
Test your complete application:
- Create customers with multiple projects
- Search for customers using company name or project name
- Edit existing customers and their projects
- Observe dynamic behavior: calculated fields, conditional visibility, dropdown lists
Key Concepts Learned
- Page Design: Creating user-friendly interfaces with layouts and components
- Flow Creation: Building business processes with actions and pages
- Lookups: Implementing search functionality with parameters and filters
- Menu Integration: Connecting flows to user interface navigation
- Selectors: Managing one-to-many relationships in the UI
- Dynamic Behavior: Seeing calculated fields and visibility rules in action
- Complex business rules and validations
- External system integrations
- Advanced reporting and analytics
- Custom scripting and automation