Your First Application
Overview
In this tutorial, we'll create a simple CRM system to manage customer contacts and projects. This hands-on guide will walk you through the essential steps of building your first Opadeez application from scratch.
What You'll Build: A Customer Database system with user authentication, customer management, and project tracking capabilities.
Prerequisites
- Access to Opadeez Studio (contact your system administrator for credentials)
- Basic understanding of web applications
- Familiarity with database concepts
Part 1: Creating Your First System
Step 1: Login to Opadeez Studio
- Open your web browser and navigate to Opadeez Studio
- Enter your credentials (if you don't have access, contact your system administrator)
- Click "Login" to access the Studio interface
Step 2: Create a New System
- In the Studio interface, navigate to System → Create a new system
- Fill in the system details:
- System name:
Customer Database - Version:
0.0.1 - Package name:
com.crm
This is the Java package name used to generate solution classes - Webserver path:
/usr/local/tomcat - System URL:
https://opadeez.innovelab.com/CustomerDatabase
This URL will be used to access the runtime application
- System name:
Step 3: Include User Management System
To provide authentication capabilities, we'll include the pre-built UserManagement system:
- In the System includes section, add:
- System:
UserManagement(select latest version) - Prefix:
UM
This prefix will be used to access user management components
- System:
- Click "Save all" to create the system
Success! Your system now has the basic user management data model pre-configured with authentication capabilities.
Step 4: Configure Users Table
While still in the System information page, you need to configure which table will be used for authentication:
- In the "Users table" dropdown list, select UM.User
This table is part of the UserManagement solution (notice the UM prefix) and will store user information for authentication
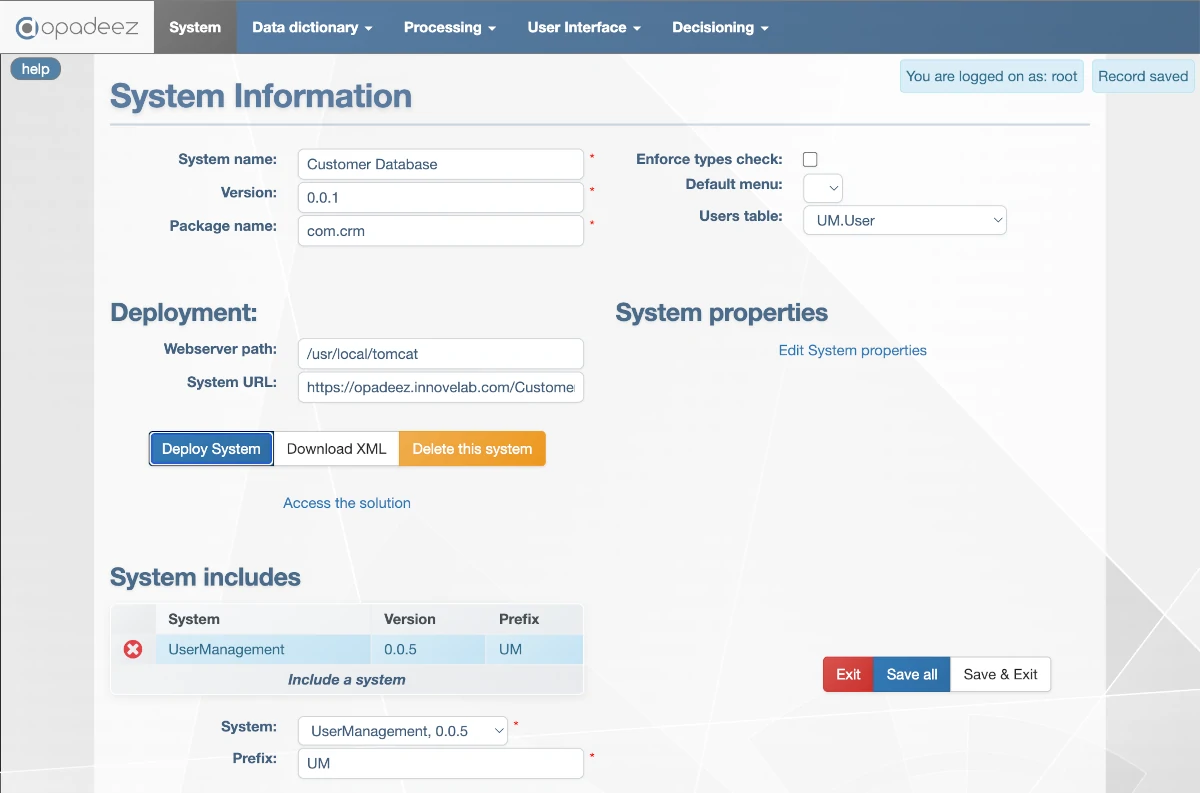
Complete System Information setup with UserManagement included and UM.User table selected
Step 5: Deploy Your System
- Click "Deploy System" to start the deployment process
- The System deployment window will show:
- Deployment steps in real-time
- Progress indicators
- Status messages
- Wait for the "System deployment successful" message
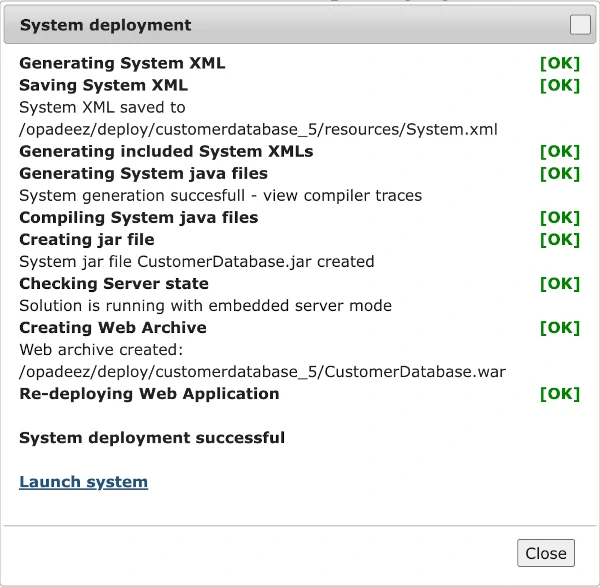
System deployment window showing the deployment process and success status
Step 6: Launch Your Application
- Click "Launch system" (this is a direct link to your Customer Database runtime)
- A new browser window/tab will open with your running application
Testing Your Application
Exploring the Runtime Interface
Once your application launches, you'll notice:
- Page Footer: Shows the solution name and version
- Home Page: Displays the default User Management interface (we'll customize this later)
- Login: Standard login page for authentication
Login to Your System
- Click on "Login" in the application interface
- Use the default administrator credentials:
- Username:
root - Password:
secret
- Username:
- Click "Login" to access the system
Congratulations! You've successfully created and deployed your first Opadeez application with user authentication capabilities.
What's Next?
This completes Part 1 of the tutorial. Continue with:
- Part 2: Create a menu bar with the "Security" option used to call the User Management user maintenance functionalities
- Part 3: Create a simple data model to store Customers and Projects information
- Part 4: Create basic flows and UI for the customer database functionalities
Key Concepts Learned
- System Creation: How to define a new Opadeez system with proper configuration
- System Includes: Leveraging pre-built components like UserManagement
- Deployment Process: From Studio configuration to running application
- Runtime Access: How to access and test your deployed application
- Authentication: Built-in user management and login capabilities
Pro Tip: Always test your system after each major configuration change to ensure everything works as expected before adding more complexity.