Your First Application - Part 3
Creating the Data Model
In Part 2, we created a menu system with security access. Now we'll create a simple data model for our customers and projects, including relationships and business rules.
Step 1: Create the Customer Entity
Let's start by creating our first entity to store customer information:
- Navigate to Data Dictionary → Entities / Attributes
- Click "New Entity"
- Set Entity name:
Customer - Save the entity
Step 2: Add Customer Attributes
Now we'll add attributes to the Customer entity. Make sure the Customer entity is selected:
Company Name Attribute
- Click "New Attribute"
- Configure the attribute:
- Attribute name:
CompanyName(no spaces) - Label:
Company name(can have spaces) - Type:
String - Length:
50
- Attribute name:
Relationship Date Attribute
- Click "New Attribute" again
- Configure the attribute:
- Attribute name:
RelationshipDate - Label:
Relationship date - Type:
Date
- Attribute name:
Calculated Relationship Duration Attribute
Let's create a field that automatically calculates the relationship duration in years:
- Click "New Attribute"
- Configure the attribute:
- Attribute name:
RelationshipDuration - Label:
Relationship years - Type:
Integer - Length:
4 - Formula:
dateDiff(RelationshipDate, now(), "y")
- Attribute name:
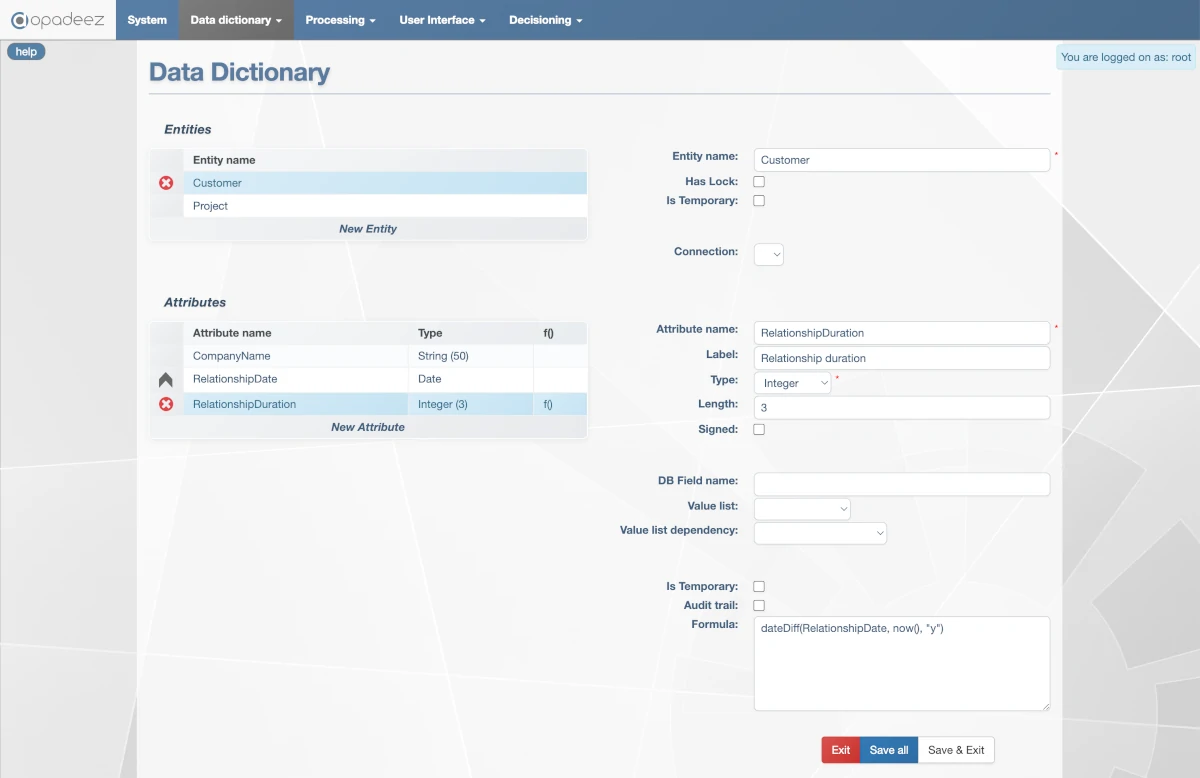
Formula configuration for auto-calculating relationship duration in years
This formula will dynamically calculate the relationship duration whenever the field is displayed or used in a calculation.
Step 3: Create the Project Entity
- Click "New Entity"
- Set Entity name:
Project - Save the entity
Step 4: Add Project Attributes
With the Project entity selected, create the following attributes:
Project Name Attribute
- Click "New Attribute"
- Configure:
- Attribute name:
Name - Label:
Project Name - Type:
String - Length:
50
- Attribute name:
Project Status Attribute
- Click "New Attribute"
- Configure:
- Attribute name:
Status - Label:
Status - Type:
String - Length:
1
- Attribute name:
Step 5: Create Value List for Project Status
To make the Status field display as a dropdown list, we'll create a value list:
- Navigate to Data Dictionary → Value Lists
- Click "New Value List"
- Set Value List name:
ProjectStatus
Add Status Options
- Click "New option" and configure:
- Value:
P - Text:
Pre-sales
- Value:
- Click "New option" again for:
- Value:
I - Text:
In-progress
- Value:
- Click "New option" once more for:
- Value:
C - Text:
Complete
- Value:

ProjectStatus value list with Pre-sales, In-progress, and Complete options
- Click "Save all" to save the value list
Step 6: Associate Value List with Status Attribute
- Go back to Data Dictionary → Entities / Attributes
- Select the Project entity
- Select the Status attribute
- In the Value List dropdown, select ProjectStatus
Step 7: Create Relationship Between Entities
Now we'll create a relationship saying that a Customer can have multiple projects:
- Navigate to Data Dictionary → Links
- Click "New Link"
- Configure the relationship:
- Link name:
CustomerProject - Entity from:
Customer - Entity to:
Project - Cardinality:
0(0 means unlimited)
- Link name:
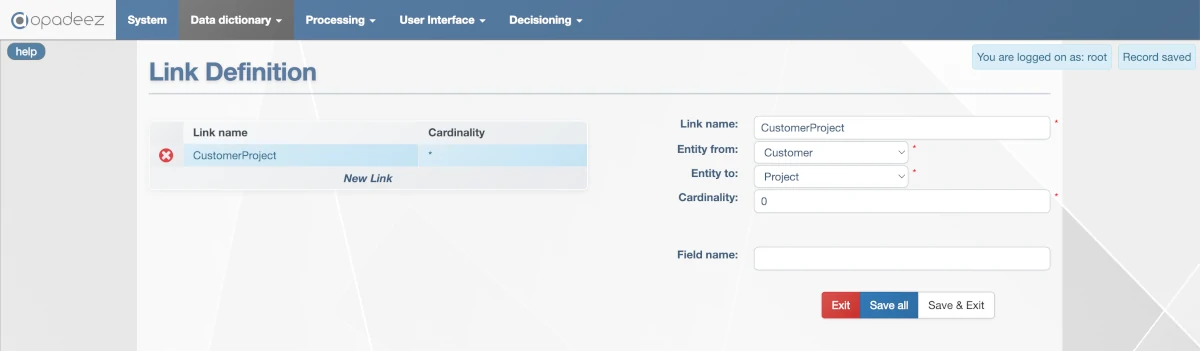
Link configuration showing one-to-many relationship between Customer and Project
- Save the link
Step 8: Understanding DataSets
We've created the database structure with Entities, Attributes, and Links. Now we need to create a "DataSet" - a specific view of the data.
Examples of different DataSet approaches:
- Customer-focused DataSet: Start from Customer, access their projects and related information
- Project-focused DataSet: Start from Project, access customer information and other project-related data
Step 9: Create Customer DataSet
- Navigate to Data Dictionary → Data Set
- Click "New Data set"
- Set DataSet name:
Customer
Add Customer Entity to DataSet
- Click "Add entity to Data set"
- Configure:
- Alias:
Customer - Entity name:
Customer
- Alias:
- Save this entity
Add Project Entity to DataSet
- Click "Add entity to Data set" again
- Configure:
- Alias:
Project - Entity name:
Project - Link from entity:
Customer(save the previous entity first to see it in the list) - Link name:
CustomerProject
- Alias:
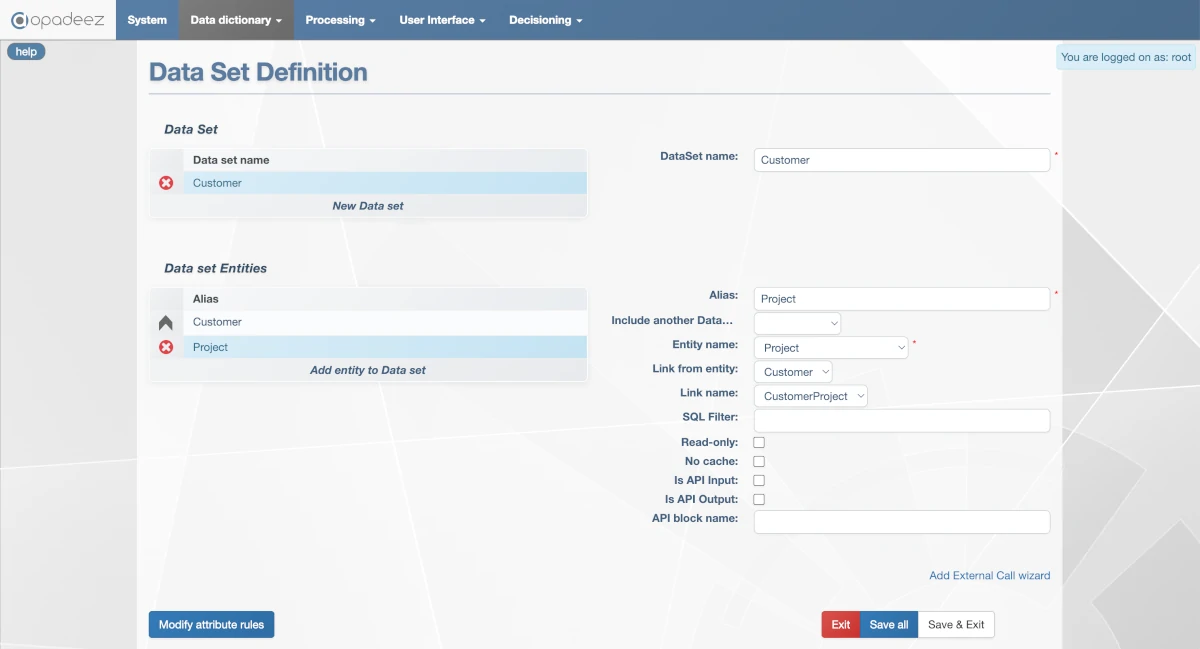
Customer DataSet showing the hierarchical relationship between Customer and Project entities
- Save your changes
Step 10: Configure Dynamic Attribute Rules
Let's demonstrate Opadeez's dynamic attribute rules by making the RelationshipDuration field conditionally visible:
- Make sure the "Customer" DataSet Entity is selected
- Click "Modify attribute rules" to open the DataSet Attributes page
- Click "Add Attribute definition"
- Configure the rule:
- Attribute name:
RelationshipDuration - Visibility rule:
Customer.RelationshipDate <> ""
- Attribute name:
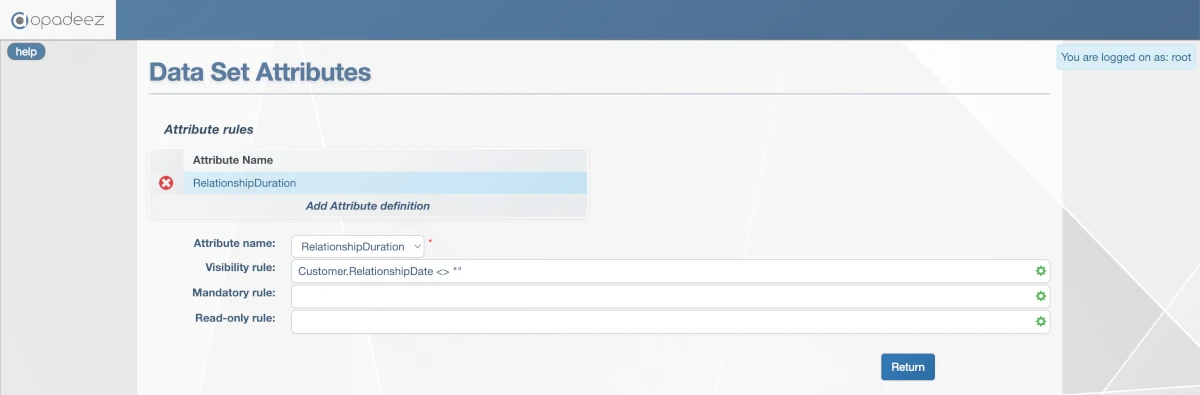
Dynamic attribute rule making RelationshipDuration visible only when RelationshipDate has a value
This rule ensures that the RelationshipDuration field is only visible when the customer has a relationship date entered.
- Two entities (Customer and Project)
- Calculated fields with formulas
- Value lists for dropdown selections
- Entity relationships
- DataSets for data navigation
- Dynamic attribute rules
What's Next?
This completes Part 3 of the tutorial. Continue with:
- Part 4: Create basic flows and UI for the customer database functionalities
Key Concepts Learned
- Entity Design: Creating entities and attributes with proper data types
- Calculated Fields: Using formulas for automatic calculations
- Value Lists: Creating dropdown options for better user experience
- Entity Relationships: Linking entities with cardinality rules
- DataSets: Creating navigable views of your data model
- Dynamic Rules: Implementing conditional visibility and behavior