Your First Application - Part 2
Creating Menu Bar and Security Access
In Part 1, we created a basic system with user authentication. Now we'll add a menu bar and configure security access to make the application functional for users.
Current Status: When you login to the Customer Database solution, you don't have access to any functionalities or menu bar. This is normal - we haven't created a menu structure yet!
Step 1: Create the Default Menu
Back in the Studio, we need to create a menu structure for our application:
- Navigate to User Interface → Menus
- Click "Create a new Menu Item"
- This will be the parent menu holding all functionalities accessible by users
- Set the Menu name:
Default menu - Save your changes
Step 2: Configure System Default Menu
- Go back to the "System Information" page
- In the "Default menu" setting, select "Default menu" from the dropdown
- If the menu doesn't appear in the list, click "Save all" first to make it available
Note: The Default Menu must be saved before it becomes available in the dropdown list.
Step 3: Create Security Menu Item
Now we'll create a "Security" menu entry that reuses the menu definition from the User Management solution:
- Navigate back to User Interface → Menus
- Click "New Menu item"
- Configure the menu item:
- Menu name:
Security - Call another menu:
UM.Security
This tells the menu to replicate the User Management "Security" menu functionalities - Id:
1
Used to associate menu items with access rights (more details on this below...) - Depth:
1
Creates the correct hierarchy level
- Menu name:
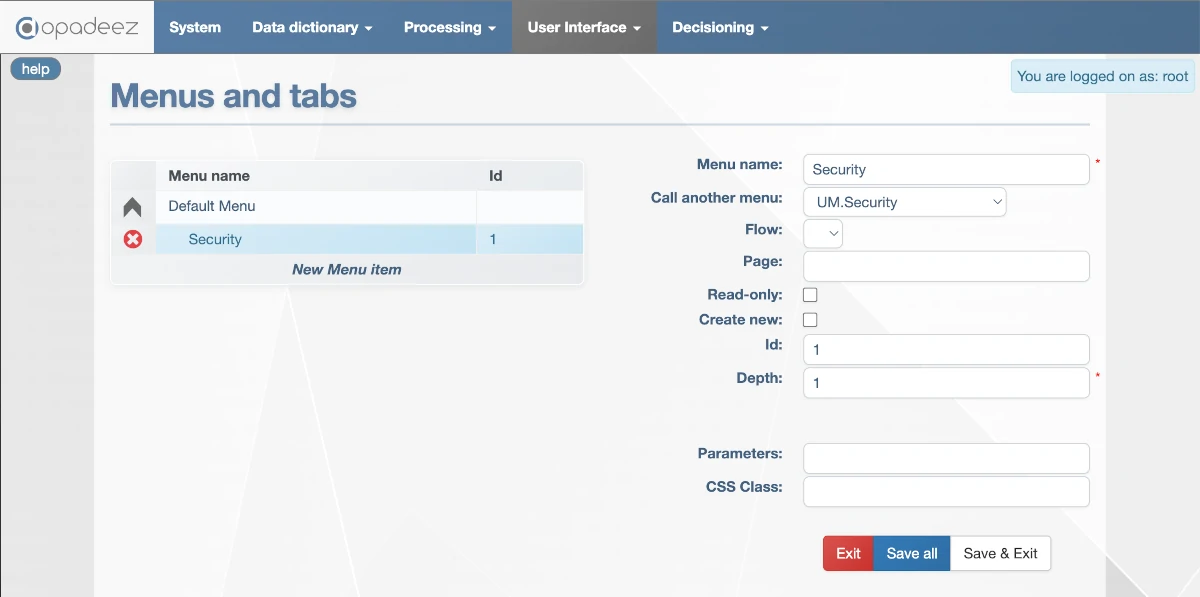
Security menu item configuration showing the UM.Security reference and access settings
- Save your changes
Step 4: Deploy and Test the Menu
- Go back to the System Information page
- Click "Deploy System"
- Wait for deployment completion
- Login to the runtime application
Success! You now have a menu bar after login with:
- Security: Pre-built User Management menu with Users and Groups maintenance
- Logout: Button to close your session
Step 5: Configure System Properties for Access Rights
When you try to use the Groups Maintenance menu, you'll see this warning:
WARNING: your solution has no MENU_OPTIONS system property
This happens because the User Management solution provides flexibility to create custom access rights. We need to define these:
- In the Studio, from the System Information page, click "Edit System Properties"
- Create a new property:
- Property name:
MENU_OPTIONS - Value:
Security,Customer read,Customer write
- Property name:
- Save the property
Remember: We used Id "1" for the Security module. This means it's the first security option in our MENU_OPTIONS definition. So "Customer read" access right will be Id 2, and "Customer write" will be Id 3.
Step 6: Deploy and Configure Groups
- Save and deploy the solution again
- Login to the runtime solution
- Go to Security → Groups Maintenance
- Click "Create a Group" and configure:
- Group Name:
Admin - Allowed Menus: Select all 3 options
- Click "Save"
- Group Name:
Access Rights Model: In the User Management solution, access rights are defined at Group level, and each User belongs to one group. This is a simple but fully customizable implementation.
Step 7: Assign Users to Groups
- Go to Security → Users Maintenance
- You'll see the existing default
rootuser - Select the root user and associate it with the "Admin" group
- This gives the root user access to all solution functionalities
Testing and Experimentation
Feel free to experiment with the security system:
- Create additional groups with different access rights for testing
- Create new users with different group assignments
- Test login with different users to see how access rights work
Congratulations! You now have a fully functional menu system with security access controls.
What's Next?
This completes Part 2 of the tutorial. Continue with:
- Part 3: Create a simple data model to store Customers and Projects information
- Part 4: Create basic flows and UI for the customer database functionalities
Key Concepts Learned
- Menu Structure: Creating hierarchical menu systems
- Menu Reuse: Leveraging existing menus from included systems
- System Properties: Configuring application-wide settings
- Access Rights: Group-based security model
- User Management: Creating and managing users and groups
Pro Tip: Always test your security configuration with different user accounts to ensure access rights work as expected.